Sep 16, 2009
Sold
This Oak form has two holes. One in the top and the one in the front. Of course the one in the top was necessary to hollow out the form. The one in the front developed as I hollowed out the piece. As you can see the bark remains on the front of the piece which is what I wanted – a natural side showing as much bark as possible. I also wanted the walls to be as thin as I dared. The oak blank I turned this piece from had a small inclusion (dent). As I turned the inside hollow, the sap wood was thinner under the inclusion and the hole formed.
Not to fret. The location, shape and size of the front hole adds to the character presented by the bark face. This makes the piece unusual and pleasing to the eye. It adds an element of surprise to this Form.
The Oak for this piece came from our friend’s forest in Andrews, NC. I returned it to them and now it resides on their fireplace mantle.
Sep 15, 2009
Piece #148 – Ear Tree – 5″ dia by 9″ tall – SOLD
This hand crafted flower vase in made from the Guanacaste tree (ear tree). The heartwood is dark and rich while the sapwood is white. The end grain is very stringy, fuzzy or fibrous and difficult to turn. It is a hardwood but is very light in weight.
The ivy is hand carved and dyed green. The dark lines were burned in. Look at the contrasting shades of the wood from front to back.
Sep 15, 2009
Given to my Sister-in-law for Christmas. Merry Christmas Maggie.
This Oak pedestal bowl has a partial dipped natural edge. It was made to display pine cones. My wife loves pine cones displayed in a nice arrangement. This bowl shows off the natural bark rim contrasted next to the pine cones. The bowl is 8 inches in diameter and 4.5 inches tall.
Sep 15, 2009
Piece #114 – Natural Spalted Oak – 6″ dia by 5″ – Sold
This oak closed form is 6 inches in diameter and 5 inches tall. The entire top was left with the natural bark of the oak tree. The wall thickness is about 1/2 inch. The oak sap wood has spalted leaving the unusual figure and color in the wood.
Sep 15, 2009
Sold
Sep 15, 2009
Piece #134 – Beech – Sold
Sep 15, 2009
Piece #111 – Maple – Sold
Sep 9, 2009
Piece #158 – Oak – 8.5″ dia x 5.5″ – Sold
This piece was sold on June 4th at the Lenoir City Arts and Crafts Festival.

Sep 9, 2009
Piece #117 – Chinese Elm – 10″ dia by 6″ – SOLD
This natural edge bowl is turned from Chinese Elm. It is 10 inches at it’s widest and 6 inches deep. Notice the random spikes of heartwood shooting out from the pith in the center. Very dramatic. The bark left on the upper sides of the bowl add an element of surprise to catch the eye. This is an awesome piece of art, even if I do say so myself.
Side View
This was a very difficult piece of wood to turn because of its very odd shape and hollowing the end grain. The bowl is cut from the middle of the tree so that the center of the dish is the pith surrounded by the heartwood. Next is the sapwood and exterior bark. I could only turn the center out to about 6 inches because the lathe spins the wood in a true circle. When the bottom and lower walls were the right thickness I parted the piece from the lathe.
From this point on it was all hand work. I roughed out the rest of the bowl sides with my Dremel® and a number 115 high speed cutter. Once the bulk of material was removed I switched to my one inch ball die grinder fastened to my air compressor. This tool was used to bring down the high spots. Next I switched to a round hand scraper. Using much elbow greese and a lot of patience I thinned down the wall to a relativly uniform thichness. From this point I sanded with 80 grit sandpaper through 220 grit then applied Minwax® Tung Oil Finish to bring out the color in the wood. I let this dry about a week. I then applied three coats of Minwax® Polyurethane semi-gloss.
This would make a great wedding gift.
Aug 31, 2009
Piece #153 – Spalted Oak with copper leaf – 4.5″ diam by 15″ tall – SOLD
This oak pitcher is made from spalted oak. The copper leaf is around the black knot near the bottom and extends almost all the way around. My first step was to apply gilders size and lay down copper leaf on the area I wanted the copper. I let the piece dry for about a week.
To patina the copper I start the process by spraying the piece with a fine mist of water. Tissue paper was laid on randomly making sure it covered and adhered to the dampened copper. Next I dab on a solution of sodium sulfide with a piece of sponge, making sure to cover all of the dampened tissue paper. This was left to soak through the tissue and react with the copper for about 60 seconds. Using paper towels I remove the soaked tissue paper and then dab the surface dry with fresh paper towels to remove any residual sodium sulfide and stop the chemical reaction.
Aug 10, 2009
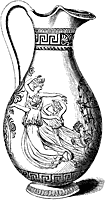
Piece #154 – Poplar & Copper Leaf Patina – 5″ diam by 9″ tall – SOLD
This Greek pitcher is made from poplar. It was turned on my lathe then hand carved using my portable dremel and hand chisels. It is nine inches tall and five inches in diameter. This poplar pitcher was first finished with sanding sealer. After a light sanding I applied three coats of black acrylic gloss spray paint sanding lightly with 220 paper between coats. After about five days I applied copper leaf on about 95% of the piece. The next day I sponged on a Sodium Sulfide and water solution using tissue paper and a cut sponge. I let it react for about three minutes and then dabbed dry the pitcher with paper towels.

Aug 10, 2009
Top view

Another view
Sold.
This bowl is about four inches deep and 12 inches across at it’s widest point. It retains the natural edge as it appeared in nature.
I applied copper leaf along some of the edges as a contrast to the wood. I then applied a patina using sodium sulfide to age the copper.
I finished this cedar bowl with Salad Bowl finish from Woodcraft.
Aug 5, 2009
SOLD
This oak vase is 9 inches tall.
Jul 31, 2009
This turned bird house is made from scraps from my fireplace woodpile. I picked up an oak limb from my woodpile and stuck it on the lathe. This was hiding inside the firewood. The red bird is hand carved. The nesting material is coconut straw.
Jul 31, 2009
This small wood vase is made from spalted maple. It is six inches tall and four inches in diamater. The figure of this wood vase blended with the natural spalting is quite striking.
sold
Jul 31, 2009
This lidded jewelry box is made from ceder. The jewelry box has two compartments and a lid. It is 8 inches tall. The bottom compartment is 4 inches in diameter and 2 inches deep. The top compartment is 3.5 inches in diameter and 2 inches deep. The lid fits into the top compartment and the top compartment fits into the bottom compartment. The ceder smell in this jewelry box is really nice. This would really be a nice valentine or birthday present for your best girl.

Jul 26, 2009
Piece #147 – Oak – 8″ dia x 12″ –
Tissue paper before patina
I turned this Greek urn from oak. I hand carved the two handles from the same oak and added them to the piece using CA glue and a small tenon. The whole piece was coated liberally with sanding sealer and allowed to dry. Over the next two days I applied two coats of black acrylic spray paint. About a week later I sanded the paint with 400 grit sand paper and cleaned it thoroughly. I then applied gilders size and laid down copper leaf covering 99% of the piece. I let the piece dry for about a week.
To start the patina process I sprayed the piece with a fine mist of water. Tissue paper was laid on randomly making sure it adhered to the dampened urn.

It’s science…
Next I dab on a solution of sodium sulfide, making sure to cover all of the dampened tissue paper. This was left to soak through the tissue and react with the copper for about 60 seconds. Using paper towels I remove the soaked tissue paper and dab the surface dry with fresh paper towels to remove any residual sodium sulfide and stop the chemical reaction.
The piece will be left to dry for at least 24 hours then the next step will be applied. My son Mitch hand painted the octopus on the urn. You can see more of his work at www.exoticwoodturning.com

Vase after the patina
http://www.youtube.com/watch?v=9M8IzRMNCZQ
Jul 22, 2009
SOLD
This wood vase was my first attempt at combining round and oval design elements. The bottom two-thirds of the piece is round and the top is oval. The top rim is not only the natural bark of the tree it is also cut off center and oblong. This natural edge wood vase is quite unusual.
I believe the wood is maple. It is about 7 inches tall and 5 inches in diameter. The finish is Minwax® Wipe-On Poly high gloss.

Jul 22, 2009
Piece #135 – Crape Myrtle – 6″ dia by 8″ tall – SOLD
First let me say this picture does not do this vessel justice. You have to see it to believe it. The wood is very hard and has spectacular translucent curls on one side. The color is tan with shades of gray swirling about. The figure is random with no particular direction. The fissures are filled with Inlace.
This Dragon’s Egg is 8 inches tall and 6 inches in diameter. The wall thickness is about 1/4 inch. This piece was very challenging and labor intense. It was made from the root ball of a Crepe Myrtle Bush. When I hauled this off the street and loaded it into my truck it was covered in dirt. It was just dug up. The soil was still wet. It was so big I couldn’t get my arms all the way around. It weighed a ton; just kidding, It was very heavy. It looked like crap. I don’t know what possessed me to drag this monstrosity home.
I hosed it down with a power nozzle to clear the dirt away. With the soil washed away it was even uglier. It looked like a deformed octopus. I cut all of the roots away from the main ball with my Poulan Pro 262 chain saw. That didn’t help the look of it, but still I thought, “what are you hiding in there?” I threw it under my work bench and forgot about it for about 9 months. When I rediscovered it I wondered if it was worth messing with.
Because it was a root ball it was not solid wood but many roots compressed into a semi ball. Between the edges of the compressed roots, fissures appeared. Not cracks but jagged fissures which ran all the way through the piece. After a severe trimming on my Rikon 18 inch band saw it still did not look like it was turnable. However, something inside that horrible, gnarled, reject of a piece of wood spoke to me.
Jul 9, 2009
Piece # 173 – SOLD
This bowl comes from Murphy NC. It is Oak from a tree my friend Luther Fowler had felled on his mountain top property. We visited last winter so I had to load up on Oak and Poplar which he had an abundance of.
Jul 9, 2009
SOLD
This is the most interesting piece of wood that came out of my worm infested Oak tree. The colors are most striking. The figure is random and very tight. The swirly ridges you see on this side of the piece were revealed just beneath the bark. The worm holes are discolored black. The piece is hollowed just enough for the votive glass to fit so it is deceptively heavy.
Jul 9, 2009
SOLD
This was my first large bowl. It is made from spalted maple I retrieved from a parking lot off of I-4 in Orlando. The walls are thicker than they should have been and the top rim is not well defined.
Jul 2, 2009
Piece #128 – Cedar – 7″ dia x 11″ – SOLD
This large cremation urn is made from Red Ceder that came from the west coast of Florida. I loved turning this piece because it smells so good. Oh yea, it’s easy to cut also. The one problem it has is a tendency to produce small checks (cracks) even though it is thoroughly dry. You can see them near the base if you look closely.
The Urn is 11 inches tall and about 7 inches wide. The lid starts at the first bead counting up from the bottom. It was dressed with Woodcraft 100% Pure Tung Oil. I applied three coats of Minwax® Helmsman® Spar Urethane and a top coat of Minwax® Wipe-On Poly high gloss, sanding between coats with 320 grit paper.
I have turned several pieces from Red Ceder as it is one of my favorite domestic wood species. I am not turning exotic wood much as it is pretty expensive and I have not started selling any of my work yet. It would be great to sell enough to support my habit.
Jun 25, 2009
Piece #132 – Spalted Maple – 7″ dia by 8″ tall – SOLD
This piece came from a tree taken down from a church parking lot from Orlando. My son and I were returning from a sales call when I spotted the tree crew from I-4. We took the next exit and swung into the parking lot. They were happy to give us what we could get into the back of my Jeep. This large block with the natural inclusion waited patiently in my shop until I was experienced enough and had a lathe big enough to turn it.
The spalting, color, figure and inclusion is very striking. This is the first piece I turned with a significant amount of “AIR” to be delt with. Turning air can be testy. I especially wanted to keep the tree bark in tact around the inclusion. This in itself was quite challenging. I used copious amounts of CA glue around the edges of the bark to help secure it in place during the turning process. Still, to my horror, a little around the bottom disintegrated. All in all I am quite pleased as are my critics.


