Oval Oak Flower Vase
SOLD
This modern oak flower vase is made from oak.
This modern oak flower vase is made from oak.
Given as a Present to my Aunt Myrtle and Uncle Richerd. Filled with walnuts and cracking tools.
Givin as a Christmas present to my brother in PA. Merry Christmas Mike!
This piece of oak has a swirling grain with highlights of different colors. It is quite spectacular.
SOLD
This deep natural rim oak bowl was turned green. Although you can’t see it in this picture it warped as it dried. The bottom of the bowl is round and the top bark rim is distinctly oval making for a dramatic effect.

Given as a Christmas present to a very dear friend.
This prayer box is made from camphor. It is about five inches in diameter and twelve inches tall. The lid separates just below the second gold ring. It took me four hours to turn the box and lid and about six times that to put on the finish.
I started with green wood. The camphor was cut into a blank and allowed to dry about two weeks. After the prayer box was turned I dried it using the microwave method. http://mgorrow.tripod.com/microwave.html After the microwave treatment I let it set for about a week.
To finish the prayer box I first applied Min Wax sanding sealer and let it dry.  The next step was a coat of latex gloss black paint which I let dry overnight. The next day I brushed on a liberal amount of Behr Premium Crackle solution to the box and lid but not the spiral handle. I let this cure for about two hours. It dries clear. I then applied a very heavy coat of tan satin latex paint. Within minutes the tan paint started to crack and slide around on the gloss black paint. When it dries it looks like very old paint – cracking and peeling. A day later I covered the whole piece with Min Wax Spar polyurethane and let it dry another day.
 The next step was to gild the spiral handle with fake gold making sure about 20% of the black paint went uncovered. I also gilded the four flat beads on the piece making sure to completely cover the black paint. The fake gold gild was left to dry overnight. The next day a liberal solution of warm water, Cupric Nitrate and Ammonium Chloride was applied to the fake gold leaf on the spiral handle only, not the four flat beads, through a thin layer of cheese cloth and tissue paper. The solution soaked tissue and cheese cloth was left on the fake gold leaf for about 15 minutes to induce a chemical reaction and turn the fake gold leaf to an aged bronze patina. After gently removing the soggy tissue paper and cheese cloth I let the piece dry over night. Go to https://woodpops.com/gallery/greek-urn/ to see more details.
Now things really got crazy. On the lid and box I randomly brushed on gilders size making sure not to get it on the gold flat beads. I also did not cover about 50% of the tan and black crackeled latex paint. When the gilders size tacked up I applied copper leaf foil and burnished it on with wax paper for a solid stick. When I was satisfied with the “look” of it all I set it aside to dry overnight. The next day I did that chemical patina thing again on the copper leaf using a solution of warm water and sodium sulfide applied to the copper leaf through the tissue and cheese cloth. I was careful not to get any chemical on the gold flat beads. After about five minutes I removed the chemical sodden tissue and cheese cloth. I let the piece dry overnight and the next day covered the whole prayer box with Min Wax Spar polyurethane.
The next step was very slight random burning with my wood burning iron: to give it more age and the look of hard use. I repeated the copper leaf foil and sodium sulfide treatment on the lid and box two more times varying the amount of time I let the chemical reaction work. This made the layers of copper leaf at different degrees of tarnishing. After each treatment I covered the piece with Min Wax Spar Polyuretehne. When I was satisfied with the completed finish I coverd it all one last time with Min Wax Satin Polyurethene.
PS. After each coat of Min Wax Polyurethene dreid I lightly sanded the piece with 320 grit sandpaper.
I learned this finishing technique from David Marks at a class I took at Woodcraft.
I made a pair of these tables from quater sawn red oak.
This western style bowl was a Christmas Present to my Sister in AZ. Merry Christmas Sandy.
I donated this piece to a woman’s club for a silent auction fund raiser to be held in February. The bowl sold for $150.00.
SOLD
Made from European Steamed Beech.
This red oak record cabinet has a stained glass door.
Made from red oak.
This beautiful Maple vase was born out of disaster! I was turning a larger vessel and my fingernail gouge caught hold of a knot edge. BAM! I had been working on this piece for a long time and had some time invested. After a few choice curse words and a respectable amount of lamenting I examined the pieces and this phoenix was born.
The spalted maple figure in this vase is quite striking. The base is 5 inches in diameter and the body is 8 inches tall. A really nice arrangement of ferns and peacock feathers compliment the vase.
This spalted maple vase makes a great home decoration and would be an unusual wedding gift or birthday gift. Not only is it one of a kind, but it is hand crafted by a future great American master – Me.
This Poplar canister, or “BOX” as we wood turners call them, is an experiment in design and color. The box is 9 inches tall and 4 inches in diameter. The walls are about 1/4 inch thick and the lid is a snug fit. The colors were produced by a multistage process and a variety of art mediums.
The first step was sanding the finished piece with 80 through 220 grit 3M aluminum oxide sandpaper. Next I put on a coat of MINWAX sanding sealer and let dry for 24 hours. After a light sanding with 220 sandpaper I sprayed the piece with gloss red paint and let dry for 4 hours. I then sprayed on some very miner highlight streaks using gloss black acrylic paint. Upon complete curing I covered the box with MINWAX gloss polyurethane and let dry for about three days.
I had just finished a turning class with David Marks, sponsored by my local Woodcraft store and wanted to try David’s process of metal leaf gilding. I sized the piece with one hour size. Using David’s techniques I laid on copper and fake gold leaf leaving about 10% of my painted surface showing. I set the work aside for 24 hours to cure.
The next day I set my work table up outside and donned my hazardous material garb. Using David’s suggested chemicals and application supplies I produced different chemical reactions on the metal leaf resulting in the final colors on the box. I set it aside for about a week before I applied three finishing coats of MINWAX gloss polyurethane.
I wanted to turn a piece of green wood to see how it would move as it dried. When this blank of oak was just cut I wrapped it in shrink wrap so it would not check (crack). I let it cure in my garage for about 8 weeks. When I unwrapped it there was this black crust on the end grain and it was quite moist.
I scraped off the mold and mounted it on my lathe. I shaped and hollowed it in about three hours. The finished piece went straight from the lathe into a five gallon bucket of denatured alcohol for a 12 hour soaking. The next morning the piece was removed from its bath and placed on a drying wrack. After about two hours I wrapped the dried pot in three paper grocery bags and stuffed it into my closet.
A month later I removed the Spalted Oak Pot from the closet and finished it my usual way. From the time the piece was cut from the tree to the finished product was about 3 months. Although the pot did not check, it moved quite a bit. You can not see it from this picture but there is a significant bulge to one side making this Spalted Oak Pot quite striking in its shape and color. All in all I pronounced this technique a success.
This very unusual gourd looking vessel is part of my “Worm Hole” collection that came from the Turkey Oak tree I cut down in my back yard. (If you haven’t read that posting, you should; it’s quite funny.) The tree was infested with worms producing the holes you see in this vessel.
It is 8 inches tall and 6 inches in diameter with a loose fitting lid. The figure and color combined with the worm holes give this Oak Vessel an abundance of character.
This work of art would look great in a country kitchen decor. You could even keep your teabags stored inside. There is nothing as rich and warm as a great piece of wood properly displayed. I also love the feel of wood texture and can often be found in my shop rubbing my wood.
Sold
This Oak form has two holes. One in the top and the one in the front. Of course the one in the top was necessary to hollow out the form. The one in the front developed as I hollowed out the piece. As you can see the bark remains on the front of the piece which is what I wanted – a natural side showing as much bark as possible. I also wanted the walls to be as thin as I dared. The oak blank I turned this piece from had a small inclusion (dent). As I turned the inside hollow, the sap wood was thinner under the inclusion and the hole formed.
Not to fret. The location, shape and size of the front hole adds to the character presented by the bark face. This makes the piece unusual and pleasing to the eye. It adds an element of surprise to this Form.
The Oak for this piece came from our friend’s forest in Andrews, NC. I returned it to them and now it resides on their fireplace mantle.
This hand crafted flower vase in made from the Guanacaste tree (ear tree). The heartwood is dark and rich while the sapwood is white. The end grain is very stringy, fuzzy or fibrous and difficult to turn. It is a hardwood but is very light in weight.
The ivy is hand carved and dyed green. The dark lines were burned in. Look at the contrasting shades of the wood from front to back.
Given to my Sister-in-law for Christmas. Merry Christmas Maggie.
This Oak pedestal bowl has a partial dipped natural edge. It was made to display pine cones. My wife loves pine cones displayed in a nice arrangement. This bowl shows off the natural bark rim contrasted next to the pine cones. The bowl is 8 inches in diameter and 4.5 inches tall.
This oak closed form is 6 inches in diameter and 5 inches tall. The entire top was left with the natural bark of the oak tree. The wall thickness is about 1/2 inch. The oak sap wood has spalted leaving the unusual figure and color in the wood.
Sold
Piece #111 – Maple – Sold
This piece was sold on June 4th at the Lenoir City Arts and Crafts Festival.

This natural edge bowl is turned from Chinese Elm. It is 10 inches at it’s widest and 6 inches deep. Notice the random spikes of heartwood shooting out from the pith in the center. Very dramatic. The bark left on the upper sides of the bowl add an element of surprise to catch the eye. This is an awesome piece of art, even if I do say so myself.

Side View
This was a very difficult piece of wood to turn because of its very odd shape and hollowing the end grain. The bowl is cut from the middle of the tree so that the center of the dish is the pith surrounded by the heartwood. Next is the sapwood and exterior bark. I could only turn the center out to about 6 inches because the lathe spins the wood in a true circle. When the bottom and lower walls were the right thickness I parted the piece from the lathe.
From this point on it was all hand work. I roughed out the rest of the bowl sides with my Dremel® and a number 115 high speed cutter. Once the bulk of material was removed I switched to my one inch ball die grinder fastened to my air compressor. This tool was used to bring down the high spots. Next I switched to a round hand scraper. Using much elbow greese and a lot of patience I thinned down the wall to a relativly uniform thichness. From this point I sanded with 80 grit sandpaper through 220 grit then applied Minwax® Tung Oil Finish to bring out the color in the wood. I let this dry about a week. I then applied three coats of Minwax® Polyurethane semi-gloss.
This would make a great wedding gift.
This oak pitcher is made from spalted oak. The copper leaf is around the black knot near the bottom and extends almost all the way around. My first step was to apply gilders size and lay down copper leaf on the area I wanted the copper. I let the piece dry for about a week.
To patina the copper I start the process by spraying the piece with a fine mist of water. Tissue paper was laid on randomly making sure it covered and adhered to the dampened copper. Next I dab on a solution of sodium sulfide with a piece of sponge, making sure to cover all of the dampened tissue paper. This was left to soak through the tissue and react with the copper for about 60 seconds. Using paper towels I remove the soaked tissue paper and then dab the surface dry with fresh paper towels to remove any residual sodium sulfide and stop the chemical reaction.
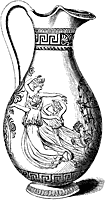
This Greek pitcher is made from poplar. It was turned on my lathe then hand carved using my portable dremel and hand chisels. It is nine inches tall and five inches in diameter. This poplar pitcher was first finished with sanding sealer. After a light sanding I applied three coats of black acrylic gloss spray paint sanding lightly with 220 paper between coats. After about five days I applied copper leaf on about 95% of the piece. The next day I sponged on a Sodium Sulfide and water solution using tissue paper and a cut sponge. I let it react for about three minutes and then dabbed dry the pitcher with paper towels.


Top view

Another view
Sold.
This bowl is about four inches deep and 12 inches across at it’s widest point. It retains the natural edge as it appeared in nature.
I applied copper leaf along some of the edges as a contrast to the wood. I then applied a patina using sodium sulfide to age the copper.
I finished this cedar bowl with Salad Bowl finish from Woodcraft.